
A well-tied necktie can instantly sharpen your look. Whether you’re dressing for a job interview, wedding, office meeting, or formal dinner, knowing the right way to knot a tie is one of those timeless skills that always comes in handy.
The good news? It’s much easier than most people think. You don’t need fancy techniques or endless practice. In this guide, you’ll learn beginner-friendly methods, classic knots, and practical tips so you can dress neatly and confidently every time.
Why Learning This Skill Still Matters
Even in a world of casual fashion, ties still play an important role. A properly knotted tie shows effort, style, and attention to detail.
You may need one for:
- Weddings
- Interviews
- Business meetings
- Graduations
- Formal dinners
- School uniforms
- Special events
Once you learn the basics, you’ll never need to panic before an event again.
Before You Start: Tie Basics
Before learning the steps, understand these two parts:
- Wide end: The thicker front section
- Narrow end: The thinner back section
Place the tie around your neck with the wide end hanging lower than the narrow end. Usually, the wide end should hang on your dominant-hand side.
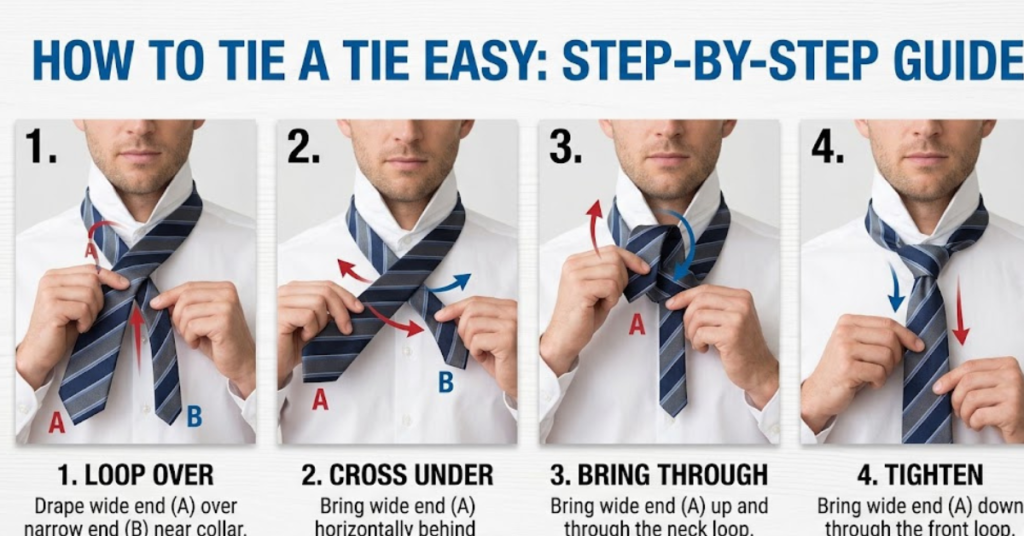
Easy Method: The Four-in-Hand Knot
This is the easiest and most popular knot for beginners. It’s quick, stylish, and slightly asymmetrical.
Steps:
- Drape the tie around your neck with the wide end longer.
- Cross the wide end over the narrow end.
- Wrap it behind and bring it across the front again.
- Pull the wide end up through the neck loop.
- Slide it down through the front loop.
- Tighten gently and center the knot.
This is the best method if you want simple instructions.
Fast Version in 3 Steps
If you’re in a hurry, here’s a simplified version:
- Cross the wide end over the narrow end and wrap once.
- Bring the wide end up through the neck loop.
- Pull it down through the front loop and tighten.
This shortcut works best when you already know the movement pattern.
Half Windsor Knot
The Half Windsor is a polished, balanced knot that suits business shirts and medium-spread collars.
Why Choose It?
- Symmetrical appearance
- More formal than Four-in-Hand
- Easier than Full Windsor
- Great for office wear
Steps:
- Start with wide end on the right.
- Cross wide end over narrow end.
- Bring it under and up through the neck loop.
- Pull to one side.
- Wrap across the front.
- Bring up through the neck loop again.
- Pull through front loop and tighten.
If you want a clean professional look, this knot is a smart choice.
Full Windsor Knot
The Windsor knot, also called the Full Windsor or Double Windsor, creates a large triangular knot perfect for formal occasions.
Best For:
- Weddings
- Presentations
- Wide collar shirts
- Important meetings
Steps:
- Place the wide end longer than usual.
- Cross wide over narrow.
- Bring up through neck loop and pull down.
- Pass behind the narrow end.
- Bring up again from opposite side.
- Wrap across the front.
- Pull up through neck loop.
- Slide through front loop.
- Tighten evenly.
This method gives a bold, elegant finish.
Practicing on Yourself
Many beginners struggle because mirror movements feel backward. Try these tips:
- Stand in front of a mirror with good lighting
- Practice slowly the first few times
- Keep the narrow end steady
- Adjust length after tightening
- Repeat until muscle memory develops
After a few tries, it becomes automatic.
Helping Someone Else
Assisting another person can feel different because you’re facing them.
Best Trick:
Imagine their right side is your left side. Move slowly and communicate each step.
This is useful for:
- Weddings
- School events
- Photoshoots
- Parents helping children
Best Choice for Weddings
For weddings, appearance matters more than speed.
Recommended Options:
- Full Windsor for formal elegance
- Half Windsor for modern clean style
- Four-in-Hand for relaxed weddings
Choose a tie that matches the suit, venue, and dress code.
Stylish Knots to Try
If you want something beyond classic knots, try:
- Eldredge knot
- Trinity knot
- Pratt knot
- Kelvin knot
These decorative styles stand out at parties or fashion-forward events.
Common Mistakes to Avoid
Even experienced people make these errors:
- Knot too loose
- Tie too short or too long
- Crooked knot
- Wrinkled fabric
- Over-tightening the neck
Ideally, the tip of the tie should touch your belt buckle.
Quick Care Tips
To keep ties looking sharp:
- Untie after wearing
- Hang properly
- Store rolled or flat
- Steam wrinkles gently
- Avoid pulling too hard
Good care extends the life of silk and polyester ties.
FAQ
What is the easiest knot for beginners?
The Four-in-Hand knot is the easiest and fastest option for beginners.
What is the most formal knot?
The Full Windsor is considered one of the most formal and symmetrical styles.
How long should a tie be?
The front tip should usually end near the belt buckle.
Can I knot one without a mirror?
Yes. Once practiced, many people can do it by feel alone.
Which knot is best for weddings?
A Windsor or Half Windsor usually works best.
How long does it take to learn?
Most people learn the basics in 10–15 minutes with a little practice.
Conclusion
Learning this simple skill pays off for years. Start with the Four-in-Hand knot if you’re new, move to the Half Windsor for business settings, and use the Full Windsor when you need a polished formal look.
Practice a few times, adjust the length, and soon it will become second nature. Once you master it, getting dressed for any event becomes faster, easier, and more stylish.